Showing posts with label recipe fail. Show all posts

Sunday, June 17, 2012

Creamy Key Lime Pie Ice Cream for Father's Day!

I have to blame my dad for my love of baking. When I was a toddler, he allowed me to sit on the counter and "help" him make chocolate chip cookies or cake or fudge or whatever treat he decided to bake. In all honesty, I ate batter more than I did anything else. But I guess something stuck from those many times of watching him concoct delicious treats because I'm still baking up a storm to this day.

The theme of this month has been treats that are easy and delicious for Fourth of July get-togethers. However, since it's Father's Day, I wanted to make something that was good for both. I knew I wanted to make ice cream for my next Fourth of July treat and Key Lime Pie happens to be my dad's favorite dessert. And thus, a search for yummy Key Lime Pie ice cream began. While the following recipe is tastes good, I would not suggest it. I found it to be frustrating and disappointing, but I certainly hope you have better luck.
What you need for 2 servings:

1/2 cup granulated sugar
2 tablespoons corn starch
1/8 teaspoon salt
2 cups 2% milk
1 cup half-and-half
1 egg yolk
1 teaspoon Key Lime zest
1/3 cup Key Lime juice
1/2 cup coarsely crushed graham cracker crumbs

Whisk together the first 3 ingredients in a large saucepan. Gradually whisk in the milk and half-and-half. Cook over medium heat, stirring constantly until mixture thickens. The original recipe says 8 to 10 minutes, however, it took me a good deal longer. I would say it took about 20-30 minutes. Be patient and don't stop stirring or else you will have a mess of scalded milk.
Remove from heat.
Beat egg yolk until thick. Gradually whisk in about 1 cup hot cream mixture. Add yolk mixture to remaining cream mixture, whisking constantly.
Pour mixture through a wire mesh strainer to remove any solid bits of scalded milk. If you want it to be green, add a couple of drops of food coloring. I added 2 green and 1 yellow. Allow to cool for 1 hour, stirring occasionally. Place plastic wrap directly on cream mixture and refrigerate for 8-24 hours.
Pour mixture into 1 1/2 quart electric ice cream mixture. Prepare according to machine's instructions. About half way through, add your lime zest, lime juice and graham crackers.
This ice cream is deliciously creamy and refreshing. However, I found this recipe a little disappointing because it says it makes a quart, but it only produced about half of that. I also found it frustrating how long it took for the mixture to thicken in contrast to how long it said it should take. Overall, a tasty concept, but I bet there's better recipes out there.

Good luck and happy ice cream making!
Rosie

Source:Southern Living

Monday, March 26, 2012

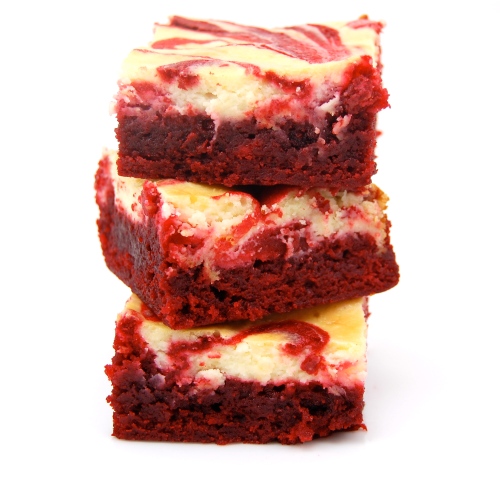
"Close Enough" Red Velvet Cheesecake Brownies

Sometimes things I bake don't come out quite right. And you know what? That's okay. It's frustrating but at some point I have to take it in stride and just enjoy treat, even if it's not perfect. That's what happened when I attempted to make these red velvet brownies. They came out pretty ugly but, did my family still eat and enjoy them? Indeed they did.
What you need:
1/2 cup butter
2 oz dark chocolate
1 cup sugar
2 large eggs
1 teaspoon vanilla extract
1 1/2 teaspoon red food coloring
2/3 cup all purpose flour
1/4 teaspoon salt
8 oz cream cheese, softened
1/2 teaspoon vanilla extract
Preheat oven to 350. Butter 8x8 square pan, line with parchment and butter parchment. In small, heatproof bowl, melt chocolate and butter together. Stir until combined and very smooth. Set aside to cool for a few minutes.
In a large bowl, whisk together the sugar, eggs, vanilla extract and food coloring.
Add chocolate mixture and stir until smooth. Add flour and salt and stir until just combined and no streaks of dry ingredients remain.
This is where my I'm going to veer from the directions I followed. Instead of spreading all of your batter, save about a third of it. Spread the rest in the bottom of your pan.
Prepare the cheesecake mixture. Beat cream cheese, sugar, egg and vanilla extract until smooth. Distribute eight dollops of chocolate batter. Using the brownie batter you set aside, spread over the cheesecake mixture. Now dollop the rest of the cheesecake batter on top of that. Using a butter knife, drag through the batter in order to swirl. Bake for 35- 40 minutes until edges are brown, cheesecake is set and a knife inserted comes out clean.
This is how my brownies looked.
This is how they looked on the recipe.
I really think that by following my modified directions, the brownies should actually turn out marbleized. However, I was significantly unimpressed even with the taste of these so I don't feel the desire to make another batch. They're a bit bland in my opinion and I think there are many better brownie recipes out there.

Saturday, December 17, 2011

Chocolate Praline Toffee Crisps and a Question

I've been trying to think of a way in which I could spice up this blog a little bit. (Spice up? Get it? XD) Having a baking blog is great and all, but there's a lot of baking blogs out there and I would love to find a way to offer you guys something unique and creative while still being helpful and interesting. If I could think of a way to integrate some of my other interests into this blog, that would be fabulous. Unfortunately, my hobbies are not exactly supportive of this plan. I love video games and actually have several video game inspired recipes I've been planning out, but I couldn't really make this blog center on that as there are already some great blogs with the same concept. My other interests include movies, fashion, make-up and reading but... Well, I just have no idea what to do with that. So if you have any suggestions on things you would like to see, I would be eternally grateful to know. Feel free to comment or shoot me a message!

But for now, onto the recipe! Today, in the search of more gift friendly treats, we're making chocolate praline toffee crisps. I'm warning you ahead of time; this recipe may be a bit wonky because it's from a Pampered Chef cookbook which means it was written for specific PC utensils and was a bit difficult to translate to what things I already had.
What you need:

12 whole graham crackers
1 cup packed brown sugar
1 cup butter (do not substitute with margarine)
1 teaspoon vanilla
2 1/2 cups coarsely chopped pecans
1/4 cup semisweet chocolate chips
1/4 cup white chocolate chips
Preheat oven to 350 degrees. Arrange crackers in a single layer in a rimmed cookie sheet. I didn't have the particular PC brand sheet so the closest thing I had was too big. This proved to work fine though. Just make sure you can fit the crackers.
Combine brown sugar, butter and vanilla in a medium saucepan. Bring to a boil over medium heat, stirring occasionally with a whisk. Boil sugar mixture 4 minutes, stirring constantly.
Remove from heat and stir in pecans.
Immediately pour sugar mixture over crackers and spread evenly.
Bake 10 to 14 minutes or until sugar mixture is bubbly and pecans are lightly toasted. Remove pan from oven to cooling rack. Cool completely.
In a small bowl, microwave semi-sweet chocolate chips on high 30 to 60 seconds or until smooth, stirring after each 20 second interval.
Place ziploc bag into a cup, tucking the excess over the rim. Pour chocolate into bag. Twist top of bag, secure with clip.
Trim corner to allow chocolate to through; drizzle over crisps. Repeat with white chocolate.
Let stand until the chocolate is firm. Cut into 24 squares and, if desired, cut the squares diagonally to form triangles. Store in an airtight container.
Though the finished product looked pretty enough, I wasn't crazy about the taste. I had several issues with this recipe. The graham crackers really didn't work out. They were too tough to cut through and they crumbled apart when I tried to cut the bars into triangles. I thought the topping was far too dry. I expected them to be a bit sticky like the filling in a pecan pie and was incredibly disappointed when that was not the case.

If you decide to try these, I highly suggest just making a crust and either not baking the bars at all or only baking them for a few minutes.

Good luck and happy baking!
Rosie

Source: Pampered Chef Festive Holiday Desserts

Wednesday, November 23, 2011

In Which I Discuss Zelda and Grandma Rose's Sad Pumpkin Cheesecake

I did it guys. I was able to put down the wii remote and leave the room long enough to make a new post. Actually, I haven't had the opportunity to play the game as much as I wish. It turns out that I actually have responsibilities while home. Gross.

I'm about to wax poetic about Zelda. Feel free to skip to actual the baking if you're not interested. I won't be offended.

Anyway, if there's one thing I can say about the game, it's absolutely beautiful. When I hear people criticize the Zelda games for not utilizing the hyper realistic graphics found in most games today I get so angry. There is just something so fantastical and over the top about the Zelda games that realistic graphics would simply can't capture it. I love the dark stylization of Twilight Princess but Skyward Sword really found something beautiful for itself. For the first time, the characters seem real and tangible. Players really get a sense of the proportional difference between characters when they're looking up at Groose and his friends for the first time. There's great humor in the dialogue and game play is invigorating. Like I said, I haven't gotten as far as I would have liked, but so far this game has really blown me away.

But now to the actual point of the blog. Cheesecake. PUMPKIN cheesecake.

What you need:

For the crust
3/4 cup graham cracker crumbs
3 tablespoons melted sweet butter
1 teaspoon cinnamon
2 tablespoons brown sugar

For the filling:
2 lbs cream cheese, softened
1 1/2 cups plus 2 tablespoons sugar
5 whole eggs
1/4 cup all purpose flour
1 1 lb can of pumpkin puree
2 teaspoons pumpkin pie spice
2 tablespoons rum
1 cup heavy cream, whipped
Preheat oven to 350. Thoroughly grease a 9 inch springform pan. Combine all crust ingredients and line the bottom and sides of the pan.
Cream the cream cheese until fluffy. Gradually add 1 1/2 cups sugar and the eggs, one at a time, beating after each addition.
Gradually add flour, mixed with spice, and pumpkin. Add rum.
Pour into the crust. Now this is where things need to be modified. The recipe calls for the cheesecake to be baked for 1 hour and 45 minutes. However, I checked the cake 20 minutes before it was time and it was already overcooked. I would suggest checking this at an hour and judging the remaining baking time from there. You'll know it's done when the center is firm to the touch.
My sad burnt cheesecake. I had to trim off the really heinous parts.
 When the cheesecake is completely cool, you can make the whipped topping. Whip the cream, sweetening with 2 tablespoons sugar and 1 teaspoon rum if you would like. Pipe with a star-tipped pastry bag. Sprinkle with toasted chopped almonds or pecans.
Despite being overbaked, this cheesecake was still pretty tasty. I'm sure that if it had been baked for the right amount of time, it would have been heavenly.
As it was, the filling was not quite as creamy as I would have preferred. However, the taste was good and the cheesecake as a whole was wonderfully rich.

Good luck and have a happy Thanksgiving!
Rosie

Source: Grandma Rose's...

Monday, September 26, 2011

Angel Fluff Brownies.... That aren't fluffy?

I debated a long time before I decided to post this recipe. Basically, it didn't come out well at all. In fact, these brownies tasted pretty awful. Finally, I decided that I already post enough of my screw ups, why not post this one as well?

I really want to know if this recipe comes out better for someone else. I mean, just from the title these sound so good. I expected big chocolately pillows of goodness but I got bland, textureless bricks of sad.
Ingredients:
1 small package of instant chocolate pudding mix
2/3 cup sugar
1/2 cup flour
2 eggs (I used the equivalent in egg substitute. Could this be my mistake?)
1/3 cup butter or margarine, melted
1/4 cup whipping cream
1 teaspoon vanilla extract
1/2 cup chopped walnuts, toasted
Powdered sugar
Begin by toasting the walnuts. Spread them in a single layer on a baking sheet and bake at about 350 degrees for about five minutes or until darkened.
  Stir together first 8 ingredients in a mixing bowl until well blended. This batter is really, really thick so get those muscles ready.
Spoon batter into a lightly greased 8 or 9 inch square baking pan.
Bake at 350 for 25 minutes or until edges pull away from edge of pan. Cool in pan on a wire rack.
Sprinkle with powdered sugar if desired.
Look how sad these little squares look.
As you can see, these really didn't rise at all. If anything should make a person blissful, it's a brownie. These were just major disappointment.

Please tell me if you have better luck! I'm dying to know how these brownies are supposed to taste.

Good luck,
Rosie

Recipe Source: Southern Living Annual Recipes 1999