Showing posts with label bars. Show all posts

Saturday, June 9, 2012

Fluffy Blackberry Crumb Bars

This week, my boyfriend's mother gave me a huge bag filled with fresh, ripe blackberries. I mean, these berries were GIANT and just looked incredible. As soon as I saw them, I thought "What in the world can I make with these blackberries that everyone would like?"

Naturally, Martha had the answer.
These blackberry crumb bars are incredibly light and airy, and the combination of sweet cake with fruit makes them the perfect summer treat. They're also so easy to make that's it's not hard to make them in bulk for a large group dinner!

What you need:

6 tablespoons unsalted butter, melted

1 3/4 cups flour, spoon and leveled plus more for pan
1/2 cup packed light brown sugar

1/2 cup (1 stick) unsalted butter, room temperature plus more for pan
1/2 teaspoon salt
1/2 teaspoon baking powder
1 cup confectioners sugar
1/2 teaspoon pure vanilla extract
2 large eggs
2 containers (5 oz each) blackberries (I used 1 1/3 cup blackberries since mine were fresh picked)
Preheat oven to 350 degrees. Butter an 8 inch square pan. Line with parchment paper, leaving an overhang on two sides, and then butter and flour the paper, tapping out excess.
For the topping, in a medium bowl, whisk together melted butter, brown sugar and 1/4 teaspoon salt. Add 1 cup flour and mix with fork until it has formed large, moist crumbs. Place in refrigerator.
Now for the cake. In a medium bowl, whisk together remaining 3/4 cup flour, baking powder and remaining 1/4 teaspoon salt; set aside. In a large bowl, beat room temperature butter, confectioners sugar and vanilla until light and fluffy. Add eggs, one at a time, beating well after each addition. Reduce speed to low, mix in flour mixture.
Spread batter evenly in the pan. Make sure it's evenly distributed or you might end up with one half crispy and the other underdone!
Sprinkle the black berries on top of the batter. By the time I finished, the top was cover in berries and there were very few blank spaces. Don't worry, these berries cook down so you can't have too many of them.
Sprinkle chilled topping over the berries and batter. Bake for 40 to 45 minutes, until golden brown and a toothpick inserted in center comes out with a few crumbs attached.

Allow to cool completely in the pan. When cool, lift the cake out using the paper overhang. Cut into 16 bars.


These bars turned out simply beautiful. They cut incredibly easily and they're extremely moist and delicious.
Good luck and happy baking!

Rosie

Source: Martha Stewart

Saturday, May 5, 2012

Cinco de Mayo Sopapilla Cheesecake

Happy Cinco de Mayo! I don't know about you guys, but I'm looking forward to tacos tonight. I have to tell you a secret though... I may have cheated and started on dessert last night. What can I say? I made this sopapilla cheesecake last night, expecting to eat it tomorrow, and I just couldn't resist!
What you need:
2 cans (8 oz) refrigerated crescent rolls, butter flavor
2 (8 oz) packages cream cheese, softened
1 cup granulated sugar
1 teaspoon vanilla
1/2 cup (1 stick) butter, room temperature
3/4 cup granulated sugar
1 teaspoon ground cinnamon
Honey
Preheat oven to 350 degrees. Spray a 9x13 baking pan with cooking spray. Take one can of crescent rolls and gently roll out until they cover the bottom of the pan.
In a medium bowl, beat cream cheese, sugar, and vanilla until smooth and creamy. Spread over the crescent roll layer.
Roll out the second can of crescent rolls and lay on top of the cream cheese layer.
In a small bowl, stir together the butter, 3/4 cup sugar and cinnamon. Place dollops of butter mixture over the top crescent roll "crust". Bake for about 30 minutes, or until the crescent roll layer is golden brown and flaky. Drizzle with honey and let cool completely. Makes 12 bars.
Now tell me, if you saw this coming out of the oven, would you be able to resist? Not only does it look good, it SMELLS like heaven!
This recipe is super easy to make and requires very little time. This cheesecake is delicious as a dessert, but also makes a tasty brunch treat!

Good luck and happy baking!
Rosie

Source: allrecipes.com

Sunday, April 29, 2012

End of the Semester Nutella Brownies

It's finals week, y'all! Not that this is good news for me, but it does mean I've got three days left before going back to Texas for the summer. I'm so excited to see my family, my boyfriend and my three little dogs. I've also had a run of amazing luck this week. On Monday, I was promoted to supervisor at my job and on Friday I got the position of prose editor for an on-campus children's lit mag. So to celebrate, let's make semi-homemade Nutella brownies!
Semi-homemade treats are the best treats. These are SO EASY to make and they are just as gooey and delicious as if they were made from scratch.

What you need...

For the brownies:
1 box brownie mix
2 eggs
2 tablespoons oil
1/4 cup water
3/4 cup Nutella

For the frosting:
1/2 cup Nutella
1 1/2 cups Cool Whip

Preheat oven to 350 degrees. Spray an 8 or 9 inch square pan with cooking spray and then line with parchment paper. In a large mixing bowl, combine brownie mix, eggs, oil, water and Nutella. Stir until just combined (the batter will be a little lumpy).
 Gently spread batter into your prepared pan. Bake for 25 to 30 minutes, or until toothpick inserted in center comes out nearly clean. Don't overbake! Let brownies cool completely.
In a small bowl, fold the Cool Whip into the Nutella until blended. If you are like me, you will then eat all of the remaining Cool Whip.

Spread the whipped Nutella topping over the brownies. TRY to leave the brownies in the refrigerator for two hours before cutting. Or, eat some now, refrigerate, and eat some more later!
That is one sexy brownie. The best part about these? They take all of ten minutes to prepare.
I must warn you, these brownies are incredibly rich. Don't overestimate just how much you can eat in one sitting!

Good luck and happy baking,
Rosie

Source: Little Bitty Bakes

Monday, March 26, 2012

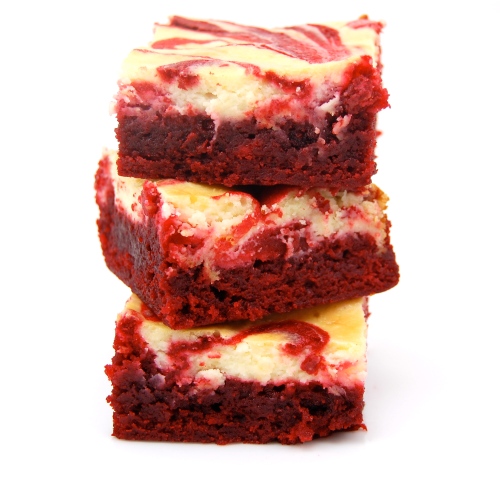
"Close Enough" Red Velvet Cheesecake Brownies

Sometimes things I bake don't come out quite right. And you know what? That's okay. It's frustrating but at some point I have to take it in stride and just enjoy treat, even if it's not perfect. That's what happened when I attempted to make these red velvet brownies. They came out pretty ugly but, did my family still eat and enjoy them? Indeed they did.
What you need:
1/2 cup butter
2 oz dark chocolate
1 cup sugar
2 large eggs
1 teaspoon vanilla extract
1 1/2 teaspoon red food coloring
2/3 cup all purpose flour
1/4 teaspoon salt
8 oz cream cheese, softened
1/2 teaspoon vanilla extract
Preheat oven to 350. Butter 8x8 square pan, line with parchment and butter parchment. In small, heatproof bowl, melt chocolate and butter together. Stir until combined and very smooth. Set aside to cool for a few minutes.
In a large bowl, whisk together the sugar, eggs, vanilla extract and food coloring.
Add chocolate mixture and stir until smooth. Add flour and salt and stir until just combined and no streaks of dry ingredients remain.
This is where my I'm going to veer from the directions I followed. Instead of spreading all of your batter, save about a third of it. Spread the rest in the bottom of your pan.
Prepare the cheesecake mixture. Beat cream cheese, sugar, egg and vanilla extract until smooth. Distribute eight dollops of chocolate batter. Using the brownie batter you set aside, spread over the cheesecake mixture. Now dollop the rest of the cheesecake batter on top of that. Using a butter knife, drag through the batter in order to swirl. Bake for 35- 40 minutes until edges are brown, cheesecake is set and a knife inserted comes out clean.
This is how my brownies looked.
This is how they looked on the recipe.
I really think that by following my modified directions, the brownies should actually turn out marbleized. However, I was significantly unimpressed even with the taste of these so I don't feel the desire to make another batch. They're a bit bland in my opinion and I think there are many better brownie recipes out there.

Sunday, March 11, 2012

Bye Bye Texas Coconut Swirl Brownies

Spring break has already come and gone. It went so fast I hardly even knew it was happening. It was great to see my family, my boyfriend and some of my friends. My best friend since middle school is actually leaving for the military this month and I'm not sure when we're going to see each other again. I have to say, she's probably the coolest person ever and I can't wait to show guys a little something we cooked up. Unfortunately, you'll have to wait until April for that little surprise. Sorry guys.

I did manage to get some baking done before I left. I had to make my nephew's birthday cake so it was a hectic time, but I also made some things just for fun. Including Martha Stewart's coconut swirl brownies.
What you need:

1/2 cup unsalted butter, cut up into small pieces, plus more for the pan
3/4 cup plus 1 tablespoon granulated sugar
1/3 cup sweetened condensed milk
2/3 cup unsweetened shredded coconut
1 large egg white
2 1/4 teaspoons vanilla extract
2 oz unsweetened chocolate, coarsely chopped
4 oz semisweet chocolate, coarsely chopped
2/3 cup all purpose flour
1/2 teaspoon baking powder
1/4 teaspoon coarse salt
3 large eggs
Preheat oven to 350 degrees. Butter an 8 inch square pan, line with parchment paper and then butter paper. Stir together 1 tablespoon sugar, sweetened condensed milk, coconut, egg white, and 1/4 teaspoon vanilla in small bowl.
Melt butter and chocolates in a double boiler. Let cool slightly. Meanwhile, whisk together flour, baking powder and salt in a large mixing bowl.
Whisk remaining 3/4 cup sugar into chocolate mixture. Add eggs, whisk until smooth. Stir in remaining two teaspoons of vanilla. Add flour mixture, stir until well combined.
Spread 1/3 of chocolate batter evenly in bottom of pan. Drop dollops of batter over the chocolate, about a tablespoon each.
Spread the remaining batter over the coconut then dollop any remaining coconut mixture over that. Using a butter knife, gently swirl coconut mixture into the batter by running the knife lengthwise and crosswise through the batter. Bake 35 to 40 minutes, or until toothpick comes out with a few crumbs, but not wet. Let cool in pan for 15 minutes and then lift onto wire rack to cool completely.
These brownies were pretty tasty, but they certainly were not my favorite. I'm a fudgey brownie kind of girl and these were definitely cakey. I would have liked to taste more coconut and I may add coconut extract the next time I make these. However, these are definitely better the next day as they get gooier. But who is that patient?
Good luck and happy baking!
Rosie

Source: Martha Stewart Cookies

Sunday, January 15, 2012

An Oreo/ Chocolate Chip/ Brownie Concoction that Will Stop Your Heart

When I first stumbled across this recipe online, I just knew I was going to have to make these. I had seen the oreo-stuffed-chocolate-chip-coookies that had gone viral online, but the addition of the brownies just took them to another level. These things are no joke. They're dangerously good but so rich and decadent that my boyfriend and I took to calling them "diabeetus bars".
What you need:
1 batch of your favorite chocolate chip cookie dough
1 package Double-Stuff Oreos
1 13x9 brownie mix
1/4 cup hot fudge
Preheat oven to 350. Grease a 9x13 pan and line with parchment paper. Whip up your cookie dough. Don't use store bought dough as you need to reduce the flour a bit. I'll put the original recipe at the end of this post.
Spread the cookie dough along the bottom of the pan.
Make a layer of oreos across the top of the cookie dough.
Prepare the brownie batter according to directions on the box but add in 1/4 cup hot fudge into the batter. Pour over the oreos and cookie dough. Cover with foil and bake for 30 minutes. Remove foil and cook for an additional 15-25 minutes. Bars are done when toothpick inserted in brownies comes out clean.
 Oh man. These are just so good. They're rich enough, but a topping of ice cream makes these perfect.
Need a cookie dough recipe? Here's the one from the original post and it's perfect!

Ingredients:
1 cup (2 sticks) butter
1 cup granulated sugar
3/4 cup light brown sugar
2 large eggs
1 tablespoon vanilla extract
2 1/2 cups all-purpose flour
1 teaspoon baking soda
1 teaspoon salt
2 cups (12 oz pkg) chocolate chips

Cream butter and sugars in a large bowl with an electric mixer on medium speed for 3-5 minutes. Add the eggs and vanilla and mix well to combine. In a separate bowl, whisk together flour, baking soda and salt then slowly add to cream mix until just combined. Stir in chocolate chips. 

Good luck and happy baking!

Source:Kevin & Amanda

Saturday, December 17, 2011

Chocolate Praline Toffee Crisps and a Question

I've been trying to think of a way in which I could spice up this blog a little bit. (Spice up? Get it? XD) Having a baking blog is great and all, but there's a lot of baking blogs out there and I would love to find a way to offer you guys something unique and creative while still being helpful and interesting. If I could think of a way to integrate some of my other interests into this blog, that would be fabulous. Unfortunately, my hobbies are not exactly supportive of this plan. I love video games and actually have several video game inspired recipes I've been planning out, but I couldn't really make this blog center on that as there are already some great blogs with the same concept. My other interests include movies, fashion, make-up and reading but... Well, I just have no idea what to do with that. So if you have any suggestions on things you would like to see, I would be eternally grateful to know. Feel free to comment or shoot me a message!

But for now, onto the recipe! Today, in the search of more gift friendly treats, we're making chocolate praline toffee crisps. I'm warning you ahead of time; this recipe may be a bit wonky because it's from a Pampered Chef cookbook which means it was written for specific PC utensils and was a bit difficult to translate to what things I already had.
What you need:

12 whole graham crackers
1 cup packed brown sugar
1 cup butter (do not substitute with margarine)
1 teaspoon vanilla
2 1/2 cups coarsely chopped pecans
1/4 cup semisweet chocolate chips
1/4 cup white chocolate chips
Preheat oven to 350 degrees. Arrange crackers in a single layer in a rimmed cookie sheet. I didn't have the particular PC brand sheet so the closest thing I had was too big. This proved to work fine though. Just make sure you can fit the crackers.
Combine brown sugar, butter and vanilla in a medium saucepan. Bring to a boil over medium heat, stirring occasionally with a whisk. Boil sugar mixture 4 minutes, stirring constantly.
Remove from heat and stir in pecans.
Immediately pour sugar mixture over crackers and spread evenly.
Bake 10 to 14 minutes or until sugar mixture is bubbly and pecans are lightly toasted. Remove pan from oven to cooling rack. Cool completely.
In a small bowl, microwave semi-sweet chocolate chips on high 30 to 60 seconds or until smooth, stirring after each 20 second interval.
Place ziploc bag into a cup, tucking the excess over the rim. Pour chocolate into bag. Twist top of bag, secure with clip.
Trim corner to allow chocolate to through; drizzle over crisps. Repeat with white chocolate.
Let stand until the chocolate is firm. Cut into 24 squares and, if desired, cut the squares diagonally to form triangles. Store in an airtight container.
Though the finished product looked pretty enough, I wasn't crazy about the taste. I had several issues with this recipe. The graham crackers really didn't work out. They were too tough to cut through and they crumbled apart when I tried to cut the bars into triangles. I thought the topping was far too dry. I expected them to be a bit sticky like the filling in a pecan pie and was incredibly disappointed when that was not the case.

If you decide to try these, I highly suggest just making a crust and either not baking the bars at all or only baking them for a few minutes.

Good luck and happy baking!
Rosie

Source: Pampered Chef Festive Holiday Desserts