Showing posts with label brownies. Show all posts

Sunday, April 29, 2012

End of the Semester Nutella Brownies

It's finals week, y'all! Not that this is good news for me, but it does mean I've got three days left before going back to Texas for the summer. I'm so excited to see my family, my boyfriend and my three little dogs. I've also had a run of amazing luck this week. On Monday, I was promoted to supervisor at my job and on Friday I got the position of prose editor for an on-campus children's lit mag. So to celebrate, let's make semi-homemade Nutella brownies!
Semi-homemade treats are the best treats. These are SO EASY to make and they are just as gooey and delicious as if they were made from scratch.

What you need...

For the brownies:
1 box brownie mix
2 eggs
2 tablespoons oil
1/4 cup water
3/4 cup Nutella

For the frosting:
1/2 cup Nutella
1 1/2 cups Cool Whip

Preheat oven to 350 degrees. Spray an 8 or 9 inch square pan with cooking spray and then line with parchment paper. In a large mixing bowl, combine brownie mix, eggs, oil, water and Nutella. Stir until just combined (the batter will be a little lumpy).
 Gently spread batter into your prepared pan. Bake for 25 to 30 minutes, or until toothpick inserted in center comes out nearly clean. Don't overbake! Let brownies cool completely.
In a small bowl, fold the Cool Whip into the Nutella until blended. If you are like me, you will then eat all of the remaining Cool Whip.

Spread the whipped Nutella topping over the brownies. TRY to leave the brownies in the refrigerator for two hours before cutting. Or, eat some now, refrigerate, and eat some more later!
That is one sexy brownie. The best part about these? They take all of ten minutes to prepare.
I must warn you, these brownies are incredibly rich. Don't overestimate just how much you can eat in one sitting!

Good luck and happy baking,
Rosie

Source: Little Bitty Bakes

Monday, March 26, 2012

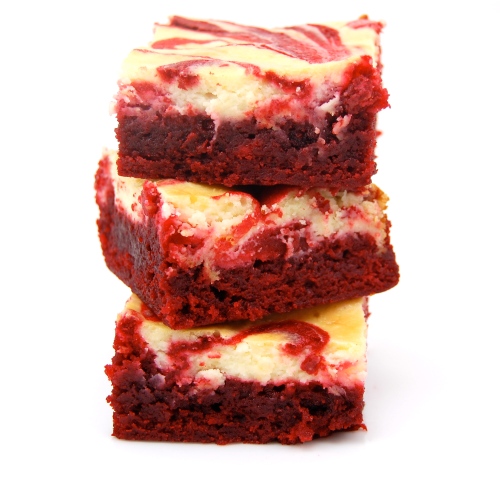
"Close Enough" Red Velvet Cheesecake Brownies

Sometimes things I bake don't come out quite right. And you know what? That's okay. It's frustrating but at some point I have to take it in stride and just enjoy treat, even if it's not perfect. That's what happened when I attempted to make these red velvet brownies. They came out pretty ugly but, did my family still eat and enjoy them? Indeed they did.
What you need:
1/2 cup butter
2 oz dark chocolate
1 cup sugar
2 large eggs
1 teaspoon vanilla extract
1 1/2 teaspoon red food coloring
2/3 cup all purpose flour
1/4 teaspoon salt
8 oz cream cheese, softened
1/2 teaspoon vanilla extract
Preheat oven to 350. Butter 8x8 square pan, line with parchment and butter parchment. In small, heatproof bowl, melt chocolate and butter together. Stir until combined and very smooth. Set aside to cool for a few minutes.
In a large bowl, whisk together the sugar, eggs, vanilla extract and food coloring.
Add chocolate mixture and stir until smooth. Add flour and salt and stir until just combined and no streaks of dry ingredients remain.
This is where my I'm going to veer from the directions I followed. Instead of spreading all of your batter, save about a third of it. Spread the rest in the bottom of your pan.
Prepare the cheesecake mixture. Beat cream cheese, sugar, egg and vanilla extract until smooth. Distribute eight dollops of chocolate batter. Using the brownie batter you set aside, spread over the cheesecake mixture. Now dollop the rest of the cheesecake batter on top of that. Using a butter knife, drag through the batter in order to swirl. Bake for 35- 40 minutes until edges are brown, cheesecake is set and a knife inserted comes out clean.
This is how my brownies looked.
This is how they looked on the recipe.
I really think that by following my modified directions, the brownies should actually turn out marbleized. However, I was significantly unimpressed even with the taste of these so I don't feel the desire to make another batch. They're a bit bland in my opinion and I think there are many better brownie recipes out there.

Sunday, March 11, 2012

Bye Bye Texas Coconut Swirl Brownies

Spring break has already come and gone. It went so fast I hardly even knew it was happening. It was great to see my family, my boyfriend and some of my friends. My best friend since middle school is actually leaving for the military this month and I'm not sure when we're going to see each other again. I have to say, she's probably the coolest person ever and I can't wait to show guys a little something we cooked up. Unfortunately, you'll have to wait until April for that little surprise. Sorry guys.

I did manage to get some baking done before I left. I had to make my nephew's birthday cake so it was a hectic time, but I also made some things just for fun. Including Martha Stewart's coconut swirl brownies.
What you need:

1/2 cup unsalted butter, cut up into small pieces, plus more for the pan
3/4 cup plus 1 tablespoon granulated sugar
1/3 cup sweetened condensed milk
2/3 cup unsweetened shredded coconut
1 large egg white
2 1/4 teaspoons vanilla extract
2 oz unsweetened chocolate, coarsely chopped
4 oz semisweet chocolate, coarsely chopped
2/3 cup all purpose flour
1/2 teaspoon baking powder
1/4 teaspoon coarse salt
3 large eggs
Preheat oven to 350 degrees. Butter an 8 inch square pan, line with parchment paper and then butter paper. Stir together 1 tablespoon sugar, sweetened condensed milk, coconut, egg white, and 1/4 teaspoon vanilla in small bowl.
Melt butter and chocolates in a double boiler. Let cool slightly. Meanwhile, whisk together flour, baking powder and salt in a large mixing bowl.
Whisk remaining 3/4 cup sugar into chocolate mixture. Add eggs, whisk until smooth. Stir in remaining two teaspoons of vanilla. Add flour mixture, stir until well combined.
Spread 1/3 of chocolate batter evenly in bottom of pan. Drop dollops of batter over the chocolate, about a tablespoon each.
Spread the remaining batter over the coconut then dollop any remaining coconut mixture over that. Using a butter knife, gently swirl coconut mixture into the batter by running the knife lengthwise and crosswise through the batter. Bake 35 to 40 minutes, or until toothpick comes out with a few crumbs, but not wet. Let cool in pan for 15 minutes and then lift onto wire rack to cool completely.
These brownies were pretty tasty, but they certainly were not my favorite. I'm a fudgey brownie kind of girl and these were definitely cakey. I would have liked to taste more coconut and I may add coconut extract the next time I make these. However, these are definitely better the next day as they get gooier. But who is that patient?
Good luck and happy baking!
Rosie

Source: Martha Stewart Cookies

Saturday, December 10, 2011

Amaretto Walnut Brownies

Guys, I'm about to share something with you that is so good, you won't even believe it.

Amaretto walnut brownies.
These brownies may be the richest, most delicious brownies I have ever tasted. They are nice and fudgy and the coffee and amaretto creates a really interesting taste.
What you need:
1 cup coarsely chopped walnuts, toasted
1/2 cup almond liqueur
1 cup butter
8 1 oz unsweetened chocolate squares
5 large eggs
3 1/3 cup sugar
1/4 cup Swiss mocha instant coffee mix
1 Tablespoon vanilla extract
1 2/3 cup all purpose flour
1/8 teaspoon salt
Soak the chopped walnuts in liqueur for 4-6 hours. Drain, discarding the liqueur.
Preheat oven to 350. Melt butter and chocolate in a heavy saucepan over low heat.
Beat eggs, sugar, and Swiss mocha coffee at medium high speed with an electric mixer for eight minutes. I know that's a weirdly long time but these brownies are so good it's worth it.
Gradually add chocolate mixture, beating at low speed until blended. Gradually add vanilla, flour, and salt, beating until blended.
Stir in walnuts. Pour into a lightly greased, foil lined 13x9 inch pan.
Bake for 30-35 minutes. Cool on a wire rack and cut into squares.
These brownies were a complete hit with my family. If I would have let them, my boyfriend and my dad would have eaten them as meals. Every time I turned around, they were sneaking one more! If you're looking for something easy to give to relatives or friends for the holiday season, these turn out really nicely and I'm sure anyone would be more than grateful to receive a tin of them.

Good luck and happy baking!
Rosie

Source: Southern Living Annual Recipes 1999

Saturday, October 22, 2011

Incredibly Easy Tombstone Brownies

Midterms are over! Huzzah! That means I can get back to baking and procrastinating.

Halloween is fast approaching and I don't know about you guys, but I love decorating treats for the season. I think I probably inherited that from my mom because when I was young, she made tons of cute Halloween treats for my class. One of those treats were tombstone brownies.
I promise you, this will be one of the easiest things you can make. They're adorable and great for parties.
What you need:
1 brownie mix and ingredients required for it
1 jar chocolate frosting
Approximately a cup of coconut
Green liquid food coloring
1 chocolate bar
White decorating icing
Candy corn, preferably pumpkins

Prepare brownies according to instructions. Line baking pan with foil for easy removal. Once cool, cut into rectangles. Frost. Break chocolate up along lines and use white icing to write "RIP". I found that using a toothpick was easiest. Stick into the corner of the brownie.
Put coconut in a ziploc bag. Use 1 to 2 drops of food coloring and shake the bag until the coconut is well covered. If it needs to be darker, add another drop or two. If it needs to be lighter, add more coconut. Place a pinch of colored coconut next to the chocolate tombstone. Put a piece of candy corn on the coconut.


You're done! What did I say? These are super quick to make. I would have preferred to use pumpkins but SOMEBODY ate all of them before I made these. I won't name names.
Good luck!
Rosie

Source: Lovingly oversimplified from Holiday Food Fun.

Monday, September 26, 2011

Angel Fluff Brownies.... That aren't fluffy?

I debated a long time before I decided to post this recipe. Basically, it didn't come out well at all. In fact, these brownies tasted pretty awful. Finally, I decided that I already post enough of my screw ups, why not post this one as well?

I really want to know if this recipe comes out better for someone else. I mean, just from the title these sound so good. I expected big chocolately pillows of goodness but I got bland, textureless bricks of sad.
Ingredients:
1 small package of instant chocolate pudding mix
2/3 cup sugar
1/2 cup flour
2 eggs (I used the equivalent in egg substitute. Could this be my mistake?)
1/3 cup butter or margarine, melted
1/4 cup whipping cream
1 teaspoon vanilla extract
1/2 cup chopped walnuts, toasted
Powdered sugar
Begin by toasting the walnuts. Spread them in a single layer on a baking sheet and bake at about 350 degrees for about five minutes or until darkened.
  Stir together first 8 ingredients in a mixing bowl until well blended. This batter is really, really thick so get those muscles ready.
Spoon batter into a lightly greased 8 or 9 inch square baking pan.
Bake at 350 for 25 minutes or until edges pull away from edge of pan. Cool in pan on a wire rack.
Sprinkle with powdered sugar if desired.
Look how sad these little squares look.
As you can see, these really didn't rise at all. If anything should make a person blissful, it's a brownie. These were just major disappointment.

Please tell me if you have better luck! I'm dying to know how these brownies are supposed to taste.

Good luck,
Rosie

Recipe Source: Southern Living Annual Recipes 1999